Gallery Walls - How To Do
and what to avoid...


How to create a stunning Gallery Wall?
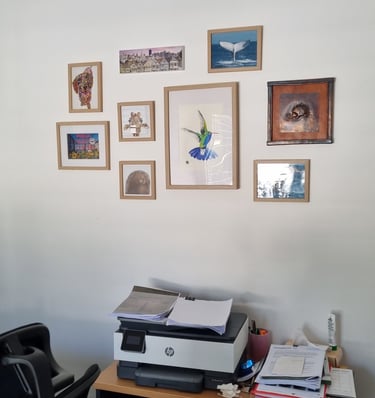
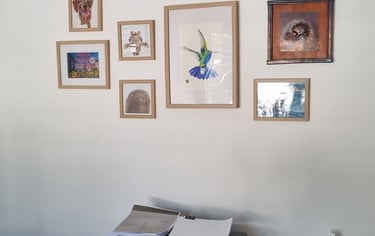
A gallery wall can be the showstopper of your home — a collection of art, photos, and prints that tells your story. But without a little planning, it can also look messy or overwhelming. Here’s how to create a gallery wall that feels stylish, balanced, and personal. If you are not sure pictureUP will help to make it look great.


Step 1: Collect Your Artwork
Gather a mix of photos, prints, paintings, or even objects (like mirrors or small shelves).
Choose a theme if you want (black-and-white photos, travel memories, abstract art) or keep it eclectic.
Step 2: Choose the Wall
Large empty walls work best — living rooms, staircases, and hallways are popular.
Make sure the space isn’t already cluttered with furniture or decor.
Step 3: Plan the Layout
Lay your frames on the floor to test different arrangements.
Or cut out paper templates the same size as your frames and tape them to the wall with painter’s tape.
Aim for a balanced overall shape (rectangle, square, or oval).
Step 4: Pick a Counterpoint
Start with one main piece (the largest or boldest artwork).
Build outwards with medium and smaller pieces so the wall feels grounded.
Combine large and small pieces, portraits and landscapes. Don’t be afraid of mixing frame colours — variety adds personality.
Gallery walls often look best when they form an overall shape: a rectangle, square, or loose oval. This keeps the arrangement tidy.
Step 5: Keep Spacing Consistent
Leave 5–8 cm (2–3 inches) between frames.
Use a ruler or a cardboard spacer for accuracy.
Step 6: Hang at the Right Height
Treat the whole gallery wall as one big artwork.
Center the arrangement so the middle is 145–150 cm (57–60 inches) from the floor.
Step 7: Hang the Frames
Start with the central piece or your anchor artwork.
Use a spirit level to keep everything straight.
Add the surrounding frames, checking balance as you go.
Step 8: Step Back and Adjust
After hanging a few pieces, step back and view the wall from different angles.
Shuffle things if it feels heavy on one side or too crowded in one area.
Common Mistakes to Avoid
🚫 Hanging Too High – A common mistake! Keep the center at eye level.
🚫 Crowding the Frames – Tiny gaps make the wall feel cramped. Leave breathing space.
🚫 Too Matchy-Matchy – Identical frames can look stiff. Mix it up for interest.
🚫 Ignoring Balance – Don’t cluster all the large pieces on one side. Spread weight evenly.
🚫 Overfilling the Wall – Sometimes less is more. Leave room for your art to “breathe.”
💡 Quick Tip: Always step back after hanging a few pieces. Seeing the wall from across the room helps you spot balance issues right away.
✨ A Gallery Wall is more than decoration — it’s a reflection of your style, memories, and creativity. Get it right, and it turns any blank wall into a masterpiece. ✨